Panoramic Awareness
Panoramic awareness is the basic trust that the space is there already.
Chogyam Trungpa Rinpoche
Chogyam Trungpa Rinpoche
This will be the first article in my series on network administration and programming. Prior to this I have mainly written on the subjects of management and sociology. Technical walkthroughs and tutorials require a different kind of writing as they deliver very specialized, somewhat transient content. In the near future we should add categories to this blog so as to not mix up the content too much.
After repeatedly going through the process of configuring various linux servers on cloud based machines with scarce resources, I decided that it would be of value to document this procedure in an article like this.
Specifically I want to focus on configuring an OpenVZ based VPS to host a blog or even a corporate website using a CMS such as Norn, the CMS for VPS.
There is a number of companies out there, big and small, that offer OpenVZ or KVM based virtual cloud servers, sometimes at impossible to resist prices. Consider a 2 CPU, 128MB setup for $6 a year(!). I suspect the hosting companies cannot raise their prices because the cheap specials cannot usually guarantee steady I/O resulting in your server CPUs spending lots of time waiting for the disk, sometimes totally freezing up. The good news is that we don't have to depend on disk I/O. Even with the measly 128MB of RAM, we can cache everything that matters, and hardly ever need to access the disk.
The articles in this series are written alongside an actual system as it’s being built. Every command is pasted from the terminal after having been successfully executed. This first part covers setting up a base secure system which will serve us as the starting point to build a very fast and surprisingly scaleable website in part two, followed by the walkthrough to set up a private DNS server (save on DNS hosting), and finally, a cloud desktop that we will access via VNC/NX/Xpra.
The distro that we are using in this article is Debian Wheezy. I do plan to expand this writeup, and include instructions for setting up a similar system in CentOS. It shouldn’t be difficult as the commands are practically identical. Note that this information could also be used to configure a mean Raspberry Pi. Since Raspbian is a variant of Debian, all commands will be the same.
In this scenario we have two machines:
Let’s start. Generally we login to the VPS via SSH as root:
[alex@horse ~]$ ssh [email protected]
Warning: Permanently added 'tonalli.net' (RSA) to the list of known hosts.
[email protected]'s password:
X11 forwarding request failed on channel 0
Linux tonalli 2.6.32-042stab108.8 #1 SMP Wed Jul 22 17:23:23 MSK 2015 x86_64
The programs included with the Debian GNU/Linux system are free software;
the exact distribution terms for each program are described in the individual files in /usr/share/doc/*/copyright.
Debian GNU/Linux comes with ABSOLUTELY NO WARRANTY, to the extent permitted by applicable law.
root@tonalli:~#
Wheezy has been around for a few years. Some key apps may only be available in the backports repo:
root@tonalli:~# echo "deb http://http.debian.net/debian wheezy-backports main" >> /etc/apt/sources.list
Let’s update the repositories, upgrade the system, and install some useful programs:
root@tonalli:~# apt-get update
root@tonalli:~# apt-get upgrade
root@tonalli:~# apt-get install vim mc git systat iotop iftop mosh multitail ruby
Wheezy comes with tmux 1.6, while most scripts expect version 1.8 and up, so we grab it from Backports:
root@tonalli:~# apt-get -t wheezy-backports install tmux
Start tmux. It’s super useful.
root@tonalli:~# tmux -2
Create a local user
root@tonalli:~# adduser devuser
Let’s become the local user, and start mosh
root@tonalli:~# su devuser
devuser@tonalli:/root$ cd
devuser@tonalli:~$ LANG=en_US.UTF8 mosh-server

MOSH CONNECT 60001 NVDXXXVlFD/NXXXjlfRlNQ

mosh-server (mosh 1.2.3)
Copyright 2012 Keith Winstein <[email protected]>
License GPLv3+: GNU GPL version 3 or later <http://gnu.org/licenses/gpl.html>.
This is free software: you are free to change and redistribute it.
There is NO WARRANTY, to the extent permitted by law.

[mosh-server detached, pid = 31336]
It’s possible that your default configuration is more secure, and you have a firewall. Check for that with
iptables -L. If you have a firewall, and prefer to stick with it, use it to open UDP ports 60001:60003 formosh. A very basic yet quite solid firewall setup is shown below.
Now that tmux is taking care of our session, let’s switch to mosh for a more smooth terminal experience:
devuser@tonalli:~$ exit
exit
root@tonalli:~#
Press Ctrl-B d to detach the session, and terminate your SSH connection to the server.
To connect in style, let’s upload our SSH key and the tmux config to the server next. From your host computer:
[alex@horse ~]$ ssh-copy-id -i ~/.ssh/id_rsa.pub [email protected]
26
[email protected]'s password:
X11 forwarding request failed on channel 0
Now try logging into the machine, with "ssh '[email protected]'", and check in:

  .ssh/authorized_keys

to make sure we haven't added extra keys that you weren't expecting.

[alex@horse ~]$ scp ~/.tmux.conf [email protected]:
.tmux.conf                                         100%  251     0.3KB/s   00:00
[alex@horse ~]$ mosh [email protected]
Here is the ~/.tmux.conf file:
set-option -g prefix C-a
bind-key C-a last-window
bind-key a send-prefix
set -g base-index 1
set -s escape-time 0
setw -g aggressive-resize on
set -g base-index 1
set -g pane-base-index 1
set-window-option -g mode-keys vi
Voila - we should be now comfortably logged in to the server as devuser. Let’s become root, and copy the tmux configuration that we’d just uploaded to the root's home directory. Reload the config from within tmux:
devuser@tonalli:~$ su
Password:
root@tonalli:~# cp /home/devuser/.tmux.conf ~/
root@tonalli:/home/devuser# tmux a
Ctrl-B :source-file ~/.tmux.conf;
At this point we are connected to our cloud server via mosh, with our session running inside of tmux. Note that the tmux prefix changed to Ctrl-A.
The objective of this section is to provide a comfortable interface, with your finger on the pulse of your cloud server. This interface is useful for debugging, testing, measuring performance and/or merely monitoring activity. There are certainly many options here, and what is presented below is but one selection of tools.
We'll start with tmuxinator
root@tonalli:~# gem install tmuxinator
Configure the environment:
root@tonalli:~# echo export EDITOR='vim' 1>> ~/.bashrc
root@tonalli:~# export EDITOR='vim'
Now su to our local user, and create the system folder for tmuxinator.
This is only useful if you are
scping the config file to the local user. Since we haven't disabled root logins via SSH yet, it would be perfectly fine to skip that step, and just do the following commands as root:
devuser@tonalli:~$ mkdir ~/.tmuxinator
Let’s copy the tmuxinator layout file:
[alex@horse ~]$ scp /home/alex/.tmuxinator/syslayout.yml  [email protected]:/home/devuser/.tmuxinator/syslayout.yml
syslayout.yml                                     100% 1759     1.7KB/s   00:00
[alex@horse ~]$
Here is the content of that file. You may want to adjust the location of log files that multitail is tracking. It’s set to show three windows - system, apache and auth. Also, check ip addr to make sure that you have the right interface in iftop. Removing the “ivenet0:0” part from the command options should make it default to the gateway, so it’s generally a safe thing to do.
name: syslayout
root: ~/

windows:
  - server:
      layout: 83b1,379x98,0,0[379x49,0,0{139x49,0,0,1,239x49,140,0,2},379x48,0,50{189x48,0,50,0,189x48,190,50,5}]
      panes:
        - top
        - multitail --no-repeat -s 2 -sn 1,5 /var/log/messages -cS apache /var/log/apache2/access.log -cS apache_error -I /var/log/apache2/error.log -cS apache -I /var/log/apache2
/other_vhosts_access.log  /var/log/auth.log -I /var/log/kern.log -I /var/log/syslog  -I /var/log/user.log
        - mc
        - iftop -pivenet0:0
Before we can start our tmuxinator dashboard, we still need to copy its folder, and place the completions file in root’s home directory (unless, of course, you did the above steps as root) :
root@tonalli:~# cp -vr /home/devuser/.tmuxinator/ ~/.tmuxinator
Now, copy the completions file from the gems installation folder, and source it:
root@tonalli:~# mkdir ~/.bin/
root@tonalli:~# cp /var/lib/gems/1.9.1/gems/tmuxinator-0.6.11/completion/tmuxinator.bash ~/.bin/
root@tonalli:~# echo source ~/.bin/tmuxinator.bash 1>> ~/.bashrc
root@tonalli:~# source ~/.bin/tmuxinator.bash
We should now exit tmux. Enter Ctrl-A &, and confirm that you want to exit. Now, run our tmuxinator layout:
root@tonalli:~# mux syslayout
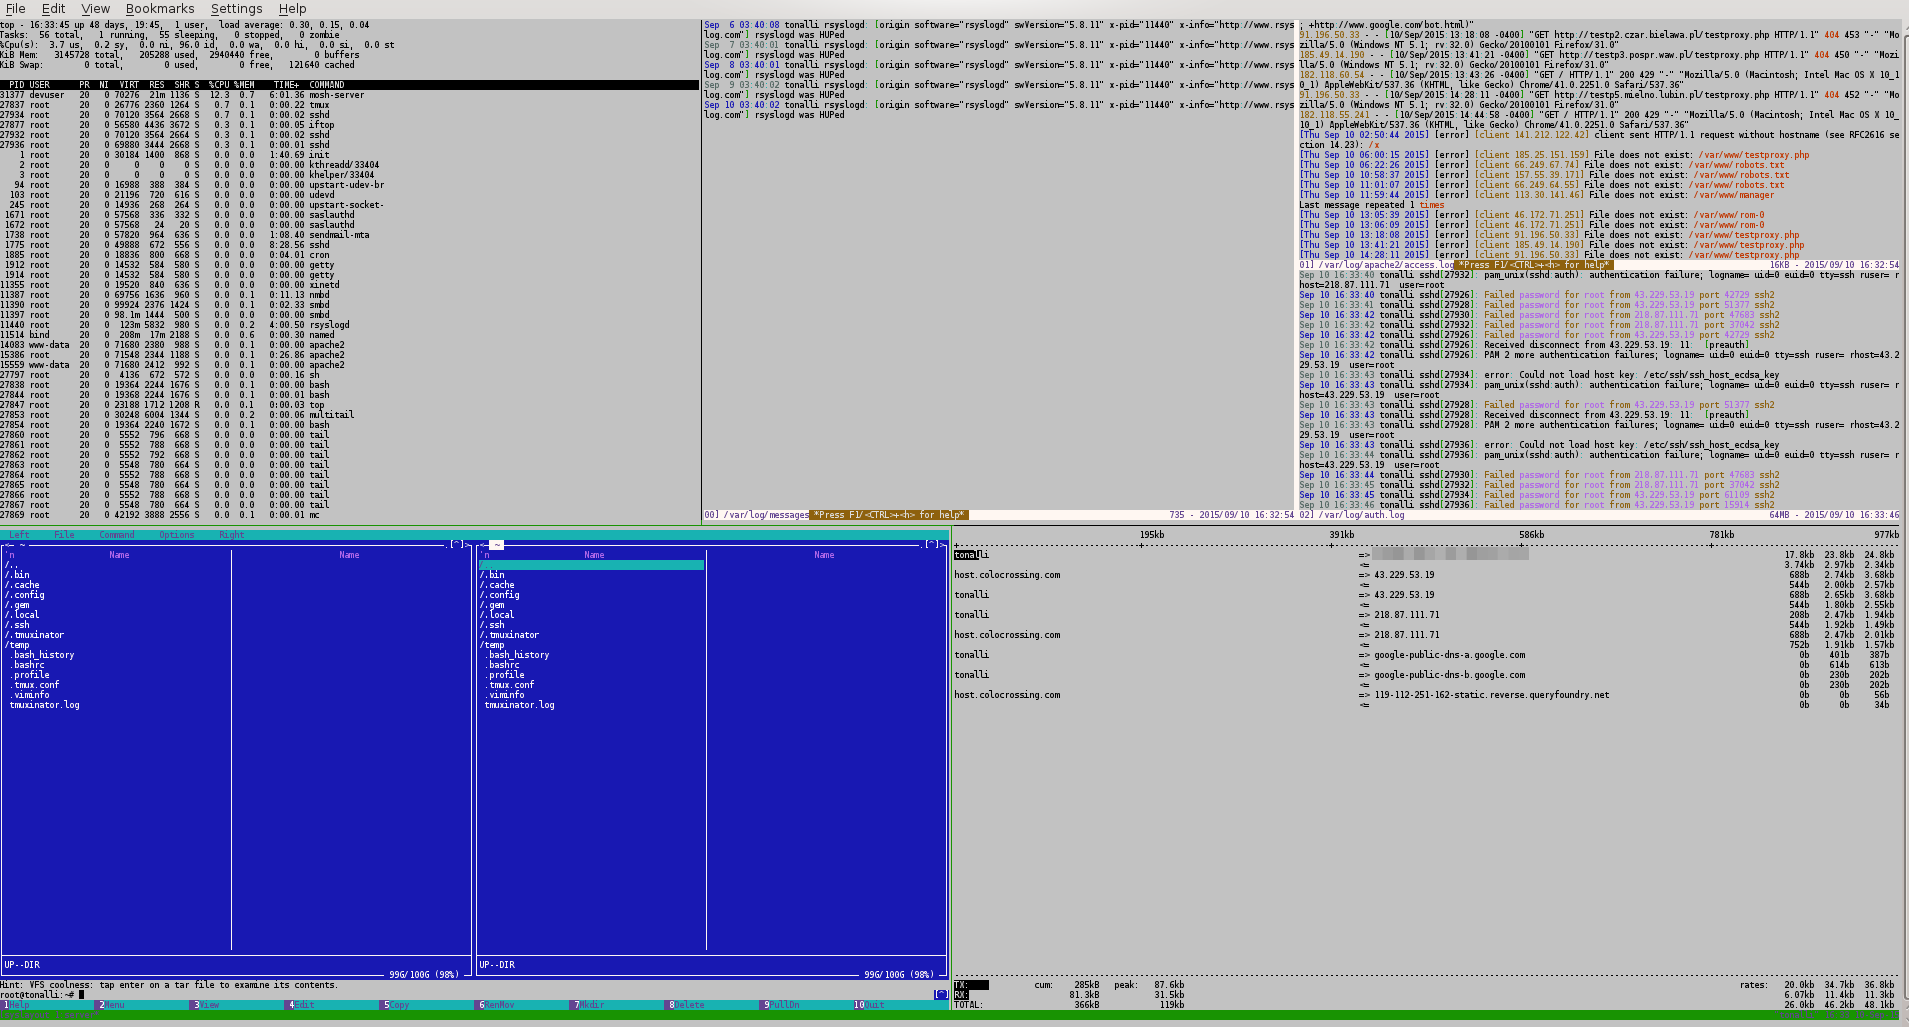
If you look at the logs pane in the screenshot above, you can see that there is an ongoing brute force dictionary attack. Such probing and scanning is the reality of today's Internet. Even if we have a strong password, there is no reason to allow attackers to keep on guessing it.
It should be mentioned that the security measures listed here are the bare minimum that will nevertheless protect you against 99% of attackers out there. Although satisfactory, the firewall could be dramatically enhanced, and I may update this article with more rules in the future.
Let’s start by disabling root logins via ssh. Edit /etc/ssh/sshd_config, and comment out (or change to ‘no’) the line that says:
PermitRootLogin yes
In addition, since we are already logging in via SSH public keys, you may consider turning off password authentication altogether. Be careful to not lose your private key on your host machine.
DenyHosts is a script that is very efficient at blocking those pesky dictionary attacks. Install it with apt-get:
root@tonalli:~# apt-get install denyhosts
Finally, let’s put together a very simple firewall. Create a file with the following contents, make it executable, and run it:
root@tonalli:/etc# vim ~/iptables.reset
Here is the content for that file. Feel free to modify it, but be careful to not lock yourself out:
#!/bin/bash
iptables -F INPUT
iptables -F FORWARD
iptables -F OUTPUT

iptables -P INPUT DROP

iptables -P FORWARD DROP

iptables -A INPUT -i lo -j ACCEPT
iptables -A FORWARD -o lo -j ACCEPT

iptables -P OUTPUT ACCEPT

iptables -A INPUT -j ACCEPT -m state --state ESTABLISHED,RELATED
iptables -A FORWARD -j ACCEPT -m state --state ESTABLISHED,RELATED

iptables -A INPUT -p tcp --dport 80 -m state --state NEW -m limit --limit 50/minute --limit-burst 5 -j ACCEPT

#iptables -A INPUT -p tcp --dport 80 -j ACCEPT
iptables -A INPUT -p udp --dport 60000:60003 -j ACCEPT
iptables -A INPUT -p tcp --dport 22 -j ACCEPT
Make that file executable:
root@tonalli:/etc# chmod 755 ~/iptables.reset
Now, run the file, and check that all the correct rules are there:
root@tonalli:~# ./iptables.reset
root@tonalli:~# iptables -L
Chain INPUT (policy DROP)
target     prot opt source               destination
ACCEPT     all  --  anywhere             anywhere
ACCEPT     all  --  anywhere             anywhere             state RELATED,ESTABLISHED
ACCEPT     tcp  --  anywhere             anywhere             tcp dpt:http state NEW limit: avg 50/min burst 5
ACCEPT     udp  --  anywhere             anywhere             udp dpts:60000:60003
ACCEPT     tcp  --  anywhere             anywhere             tcp dpt:ssh

Chain FORWARD (policy DROP)
target     prot opt source               destination
ACCEPT     all  --  anywhere             anywhere
ACCEPT     all  --  anywhere             anywhere             state RELATED,ESTABLISHED

Chain OUTPUT (policy ACCEPT)
target     prot opt source               destination
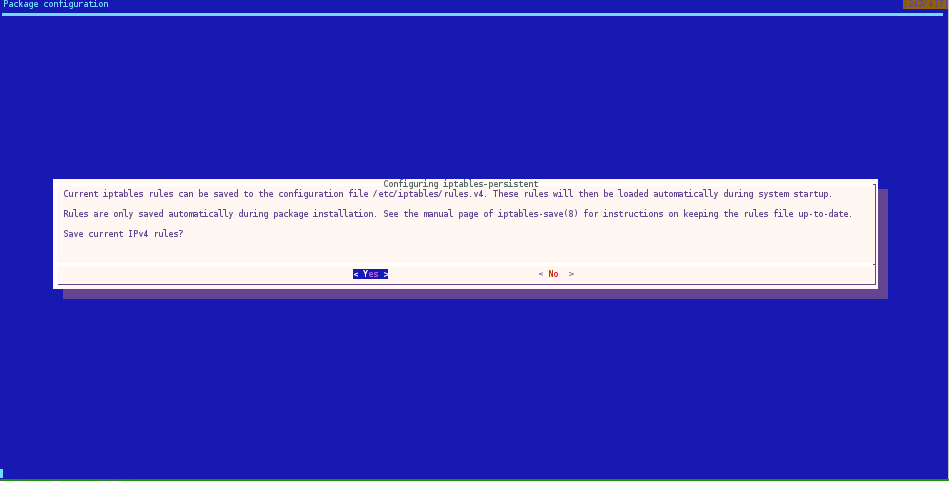
Lastly, and this is just a shortcut, install iptables-persistent to automate loading your chains on boot:
root@tonalli:~# apt-get install iptables-persistent
Save the IPv4 rules, and we are done.
At this point we have a base cloud platform that can be developed further to provide a variety of services. I left out a number of apps that would make good candidates to be installed on a base server system. More than any other, I am tempted to install Nagios, monit, autossh and shorewall, and perhaps I will write a separate article on Monitoring, and another one on Security.
As far as the next level services that this new server would be fitting for, I am planning to document the following:
nginx, varnish, memcached and maybe redis.BIND.ownCloud to create your own private Dropbox. Like Dropbox, it will even integrate with your phone, and automatically save photos and videos in your private cloud.OpenVPN server and/or Squid proxy, and access the Internet from the IP address of your cloud server.VNC, NX or Xpra from anywhere.